A Glance at The Manual
Not everyone is lucky enough to have a manual
I share mine with anyone that needs it.
I have been saying MY manual, I did explain the story in my Cd's but have just realised that I have not done the same in the Web site, and so many people will not be aware of how this information has become available. The manual was donated to me and some time later when visiting David Hay I was shown a book he had converted to CD. This was a very big job and I was surprised at how well it turned out. David when I mentioned I had a manual offered to scan the book and put it onto a CD. I jumped at this chance and David spent months completing the job (that if I had been game enough would have taken me years)
We both decided that we would make it available free to people that needed it, as neither of us were interested in making it a commercial effort, we both felt that anyone that needed it would in fact NEED it.
So I have passed it on to all Centurion owners I know and a few R.A.E.M.E. chaps and the W.A Army Museum---the Vietnam Veterans Museum---The R.N.S.W.L. museum and a couple of other people that are helping civilian owners repair their Centurions.
BUT I have neglected to menton to many of these people, the effort and time that David Hay has donated, lets face it he did all the hard work. For those people that do not know David, he is a Vietnam Veteran and was most helpful to me in that he has provided a lot of other help as well, including his photograph album and some very interesting sound tapes.
Below are some pages from the introduction
You may need to copy to a document (Word) to expand the text--sorry about that.


![]()


The basic Hull
Comparison

The Engine covers set
![]()
The Transmission covers set
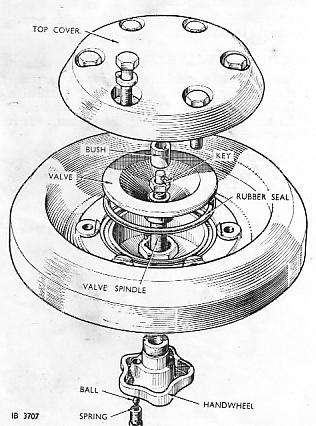
The Turret Pressure Valve
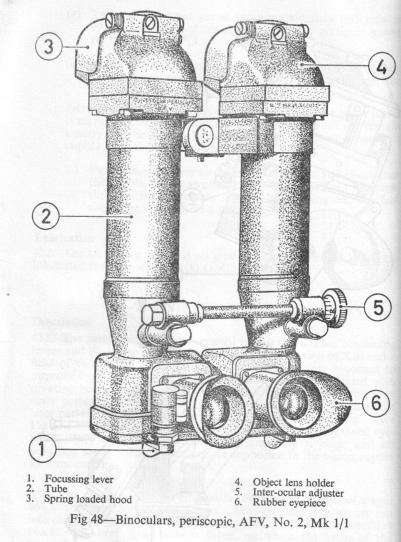
Crew Commanders Bino's

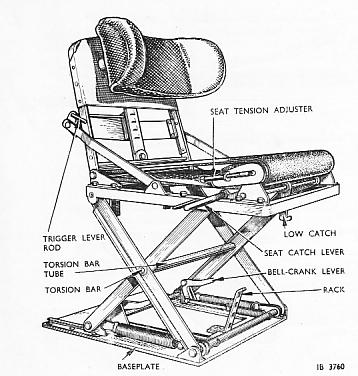
Crew Commanders Seat Late

Crew Commanders Seat Early
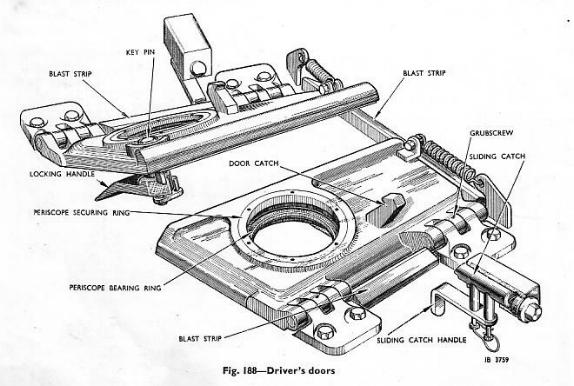


The Infra Red
Light 
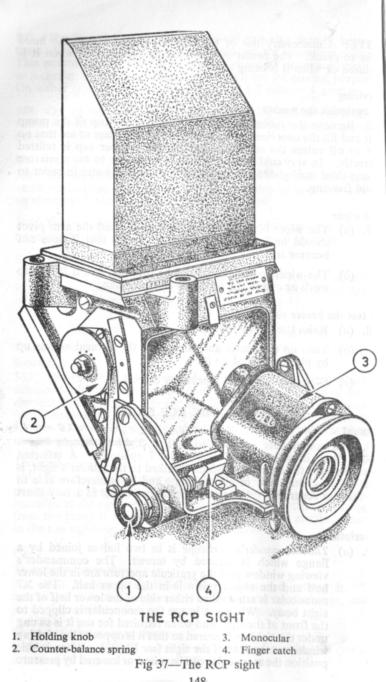
 The Infra Red Scope
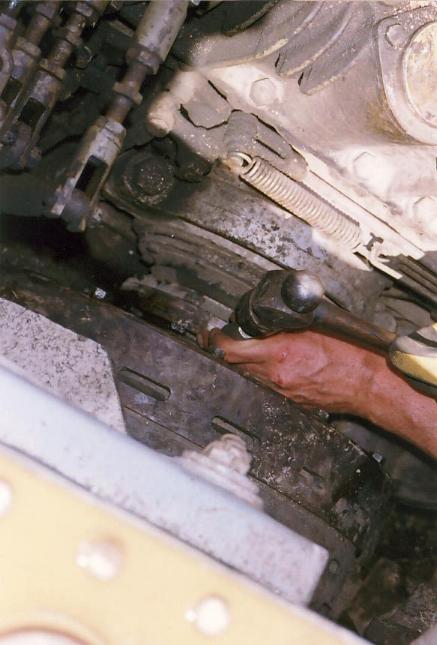
Now let us have a look at a nice little job Replacing a Clutch in a Centurion

169040 waiting to have the transmission removed

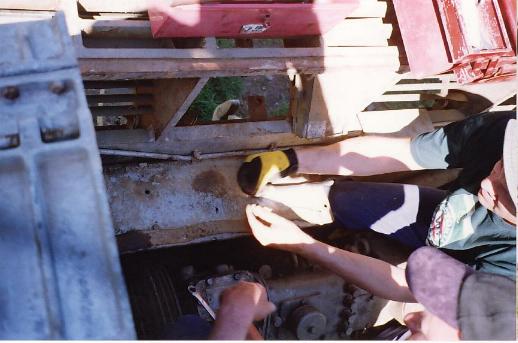
The helpers have arrived

Time to start I wonder how this will go---no Centurion experience

The rear cover plates come off fairly easy

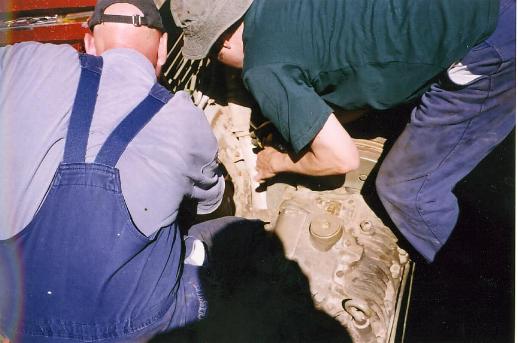
These bolts have not been moved for at least 35 years, maybe a lot longer
Every nut is screwed back onto the bolt and all were placed in separate containers, a good idea.

Next is the cover plate bracket

At the toe of the boot is the half round front transmission cover and bolts---they came out easy

The half round side holding plates on the quill shaft were also an easy removal---amazing the little items hold the quill shaft into the transmission, and all that power that's transmitted through there.

The connecting joint for the clutch to motor, its really three pieces
The rear transmission bolts. You would never believe how hard one was to undo---three extension bars all 3/4 sockets and a bar with a four foot pipe over it. One man standing on the top to put some weight onto the bar and two more , one pushing and one pulling. The pipe moved 1/3 of a turn but the bolt did not. Then as I thought the bolt would snap, But then there was a crack and it moved, thank God. It was very hard to undo but it did come out.

The gear change bracket bottom right of
picture under the linkage connectors

Trying to split the three sections of Trying to remove the last bolt from the Gear shift
the joining coupling Clutch to Motor mounting bracket

The crane arrives on a Semi Trailer

Crane stabilizers setup
![]()
Transmission is coming out
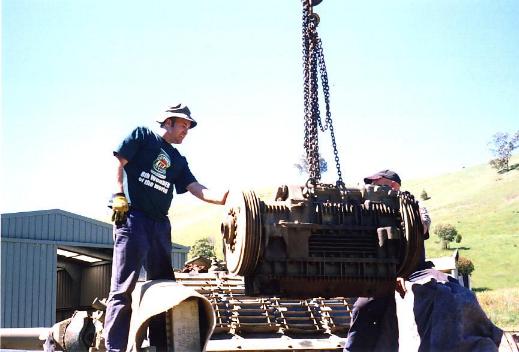
There she is

No he is not standing under it ---He is off to the side of the transmission
![]()
Setting it on the deck
![]()
Transmission showing the input flange

Clutch in the sling waiting to come out

The replacement clutch waiting to go in.
 The
clutch lifting tool that was not used ---- the crane and a sling did the job
The
clutch lifting tool that was not used ---- the crane and a sling did the job
At this time I had to leave as I had commitments for the evening. Stu later told me that they had a lot of trouble with the clutch itself. It would not slide out. I could see before I left that while the motor was rock steady (It was bolted in of course) the clutch itself would swing around quite a lot. At this point of time I left. Stu said that he had to undo 8 bolts in behind the clutch to remove it and while it was a rotten job, replacing them would be even worse. The next Saturday I was at Horsham at Ian Puls place (who owns 169055) and he also owns a stationary motor set up on a trailer. While looking at it I mentioned the clutch trouble, and he replied that the clutch should have slid out, there was no need to remove the 8 bolts. That's ok if it will slide out, which this one would not! Stu was hoping to replace the clutch the day I was at Horsham, so when I returned home I emailed the info to him, on the off chance that he had not done the job yet. In that case the offending item may be could be removed and bolted up outside, which would make the job a lot easier.
Tonight I received an Email from Matt McMahon who owns 169129. Matt has had a great amount of experience working on his Cent and this information is invaluable.
You must remove the engine oil seal by removing the small bolts around the sealing flange prior to removing the drive shaft.. The gear drive is larger than the shaft thus making it impossible to slide it out, with out removing the seal. This can be done quite easily via the inspection port in the floor and from over the top of the clutch.. A new felt seal should be installed upon re-installation.
Also you must support the clutch once disconnected from the gearbox or you run the risk of breaking the engine housing!!! This will/could ruin your day and result in a new engine also been installed!!!!
And the Gearbox must be aligned to the engine prior to the new clutch been installed using the special tool.... Tim Vibert has one and so do I. Other wise the drive will vibrate and you will feel it through the hull
My thanks to Matt for his help, without this information it could have become expensive. We knew about placing a block under the clutch but were at a loss of how the clutch was connected to the motor!
Bob Thompson from the RAEME site suggested the time (About 4 hours) for a first time civilian or even an Army mechanic was good, so all things considered Stu and his mate did a great job.
Unfortunately the replacement clutch that Stu was given when he brought the Cent, was worse than the one that came out. So now its being reconditioned and the replacement will take place a bit further down the track. At least I will be able to attend now. I will add this section when its done in a later page.